Sunday, December 12, 2010

Watercolor Rainbow Fish


          In this lesson students focused on learning the methods utilized in watercolor painting.  For motivation, the book The Rainbow Fish by Marcus Pfister was used.  The students were told that they were going to be creating their own rainbow fish to celebrate sharing (the theme of the story).  To start off the lesson the teachers taught what warm and cool colors were.  Then a discussion of the various methods used in watercolor painting was presented.  The teachers explained what flat wash (painting a section one continuous color), graduated wash (the color gradually moves from light to dark or dark to light), wet-in-wet (painting on wet paper), and watercolor resists (using a substance that resists the watercolor paint such as crayons before painting) were and how they were used in watercolor painting.  Also, during this part of the lesson students were allowed to practice each method, along with practicing using watercolor crayons.  After this, the students were allowed to begin painting their project.  The requirements of the project were that they had to use at least two elements, two watercolor methods, and opposing color schemes on the background and fish (warm vs. cool).  They were asked to paint the background first so that it would have more time to dry.  During the work time, the teachers played a YouTube video of the book The Rainbow Fish, and the students seemed to enjoy that.  Once their background was done they could work on their fish.  To save time, the teachers precut the fish for the students.  At the end of the class, students were allowed to glue the two together to finish their project.

          An extension activity for this lesson would be to have an ocean unit.  In this unit, students could create an ocean animal in the fashion of the above lesson.  The student could then research the animal they created and find out facts about where it lives, eats, etc.  Then, the student could write a story about that ocean animal.  Each student could then share their project with the class and discuss why they chose the animal they did.  Finally, after hearing about everyone else’s projects, the students could create another version of this project, only they would create their own sea creature that utilized their favorite aspects of the other students, thus pushing the students higher on Bloom’s Taxonomy. 

Printmaking

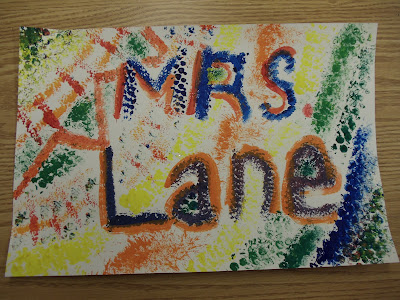
          This lesson focused on teaching texture through printmaking.  As motivation for the lesson, the teachers had put random objects with varying textures into brown paper bags.  To start off the lesson, students had to go through the line and feel the objects in the bags and write down what they thought they were.  Once students were done with this part, as a class we went through what each item was.  From this we moved into a discussion of various artists who utilize printmaking in their own pieces.  We also discussed what texture means and how can be translated into our own projects in terms of actual and implied texture.  We learned that actual texture has a texture that you can actually feel, and we learned that implied texture is the visual impression of a texture without the actual feeling of texture.  From this we had a brief review of the primary colors, the secondary colors, and the intermediate colors.  Finally, we moved into actually painting.  Each student was given the three primary colors, along with various tools to print with including items such as corn on the cob, pinecones, sponges, etc.  We were given time to practice a small sheet of paper before moving into our actual project.  During the practice, the teachers explained how to put the paint on the objects before pressing them onto our papers.  For the project, we were allowed to pick one of four types of projects, and I chose to utilize the name that I will have when I start teaching.  We were required to utilize various types of textures, along with at least one primary, one secondary, and one intermediate color.  This was very interesting because students were required to mix their own secondary and intermediate colors.

          An extension activity for this project would be to teach students patterns in math and have them create their own patterned creations using printmaking.  Students would have a visual representation of what a pattern is, and because it was more than just a pencil sketch, they would be more likely to remember the concept.

Oil Pastel Snow Globes-Foreground, Middle Ground, Background

          In this project, the students were asked to create their own snow globe utilizing oil pastels.  The teachers had snow globes sitting out on the tables for motivation.  To begin the class, the teachers showed a YouTube video that showed a man creating an outdoor oil pastel picture.  They interjected throughout the video to explain to students how he did several things such as blending, and how he started with the sky and worked his way down.  The teachers also used this video to teach the concept of foreground, middle ground, and background.  After the video, students were allowed to practice on a sheet of paper various items such as blending and creating trees.  In the project itself students were asked to utilize various elements such as color and texture, and were also asked to include at least one personal item in their project.  In the project example, the person fishing and the tent are the personal items.

          An extension activity for this project would be to use the snow globe concept as a story mapping activity.  Students could create a snow glob that depicts the scene of a story that they are reading for school, or for independent reading.  This would be interesting to utilize with students who are reading chapter books.  They could create these for various scenes throughout the story and post them in a timeline fashion around the room.

Monochromatic Painting with Shapes

          For this project students utilized the concept of tints and shades, and shapes.  First, students were allowed to pick one shape that they were going to use in their project.  The teachers reviewed a few different shapes, including circles, squares, triangles, and rhombi.  The teachers also had stencils and cups, etc. for students to utilize when drawing circles, because circles can be difficult to draw.  Students were encouraged to use a multitude of sizes in their project, and were required to have at least 7 shapes that overlapped in their project.  Once the drawing part was done, students were given one color of paint and a little bit of black and white paint.  To begin with, students were told to put a little bit of purple paint into their white paint and mix it together.  Then the students painted a line of this color onto a practice sheet of paper.  After this, students were told to put a little bit more purple paint into their white and mix it together again.  Students were asked to paint this color right below their previous tint.  Then students were asked to paint some of their sections of their circles using at least 3 tints.  After this, students were told to add a little bit of black to their purple paint.  They were asked to paint a line of this color on their practice sheet.  They were then asked to add a little more black to their purple mixture and paint the resulting color on their practice sheet.  After this, students were asked to paint a few more sections of their project utilizing at least 3 different shades of purple.  Finally, students were required to paint at least 1 section of the circles the original color.  As homework, students were asked to outline their shapes using a permanent marker.

          An extension activity for this project would be to have students make one of these paintings for all of the shapes that they learn in math.  These paintings could then be placed up on the wall as learning aids.  By doing this, students would have ownership in their learning.

Pinch Pots

In this project students created a small pot utilizing clay.  To begin with, the teachers went through a brief history of clay pots including their uses in the Native American culture, and how they differed from culture to culture.  The teachers went through the pinch pots process and the vocabulary included such as wedging, pinching, and slip.  First students kneaded, or wedged, the clay to work all of the air bubbles out.  Then students threw the clay onto the table, picked it up, and cut it in half with a wire to make sure there were no air bubbles left.  This was followed by a quick wedging to make the two pieces of clay become one.  After that, students tossed the ball back and forth between two hands to form it into a ball.  Once into a ball, the students gently pressed the center using their thumbs.  Students continued to gently press with their thumbs while slowly turning the clay.  Once into the desired shape, students smoothed out the clay with slip, a watery clay mixture, and their thumb.  If students wanted to add any shapes to their clay, such as the hearts in the example provided, they scored both the clay pot and the cut out objected, put a little bit of slip on both areas, and put them together.

An extension activity for this project would be to have the students research various Native American cultures and have them create a pinch pot in the fashion of the culture.  This would include the décor of the pinch pot, along with its shape and the contents.  Students could present their pots along with the research they found for that culture to the class.

Hidden Safari

                This product was one of the most entertaining lessons that I experienced the entire semester.  To begin the lesson, the students were asked to come up with different animals that they would see in a safari.  After this, we made our “special glasses” that we would need to see the animals on the safari.  The glasses were made out of construction paper frames with red cellophane lenses.  Then we got to practice drawing by copying small pictures of parts of the animals that we were going to be drawing.  To make students focus more on copying the lines and the movement rather than the big picture, we had to copy the pictures upside down.  After this we began our projects.  We were given pictures of animals to draw and we had to choose one to draw.  In order for this project to work, we had to draw our animals in light blue, a cool color.  After the animal was drawn, we took red yellow and orange and drew patterns over the blue picture.  Finally, at the end of class, we all took turns showing our pictures.  Students had to guess what animal each person drew, and then students were allowed to put their glasses on in order to discover what animal was actually behind the warm colors.

          An extension activity for the hidden safari would be two fold.  First, you could incorporate it into teaching students the concept of patterns.  Students could be required to utilize at least two patterns in their creation in order to assess whether they understand the concept or patterns.  Second, students could create their own study tools using the hidden concept.  A question could be written below the picture, and the answer would be hidden.  Each student would have one question to create.  After the questions were created, they could be utilized as a center in a classroom.

Starry Night Tissue Collage

This project was part of a unit on Vincent van Gogh.  For this particular project we started out with a black sheet of paper and a multitude of colors of tissue paper.  Students were told to cut out pieces of tissue paper to create their skyline with.  The teacher encouraged students to use shapes, swirls, etc. that were similar to the style of Vincent van Gogh’s Starry Night.  After it was cut out, students glued the tissue paper to their background using just a little bit of glue.  Then the entire paper was painted over using a clear adhesive and left to dry.  The next step in this project was to take another piece of construction paper and cut out a cityscape from it.  Once cut, students used oil pastels to draw windows, doors, etc. into the cityscape.  The last step before gluing the two pieces together consisted of using oil pastels to accent the tissue paper on the skyline.

          An extension activity for this project would be to have the students study a city and create a cityscape for that particular city.  For example, if a student were to be studying Paris, they would include the Eifel Tower. Another extension activity for this project would be to study stars, and have students include a constellation into their skyline.