Sunday, December 12, 2010

Starry Night Finger Painting


         This project was the first of two in a unit on Vincent van Gogh.  As motivation for both of the van Gogh projects we watched a YouTube video that meshed the song, Vincent by Don McLean, with pictures of various works by van Gogh.  We discussed the common factors of van Gogh’s paintings and how they changed through the years.  After this we did a painting with our fingers on very large paper (about the size of a desk top) using Starry Night as inspiration.  Students were told to utilize the lighter colors first, and gradually add the darker colors in.  Also, they were encouraged to take their own twist on Starry Night.  In my example, I changed the city to a field and added three cows.  The key to this project is to make sure that you use large paper.  Because students are using their fingers, which are rather large in comparison to many paintbrushes, the larger the paper is, the better the outcome.

          An extension activity for this project would be to have the students write a short story on a topic of interest to him or her.  From that short story, students would create a finger painted landscape that depicts the scene of their story.

          Another extension activity would be to have students create a series of finger paintings in the fashion of various artists from different cultures.  Students would learn about each artist and how their culture has influenced his or her creations.  From this, students would create their own finger paintings in the style of the various artists.

Eric Karl Collages

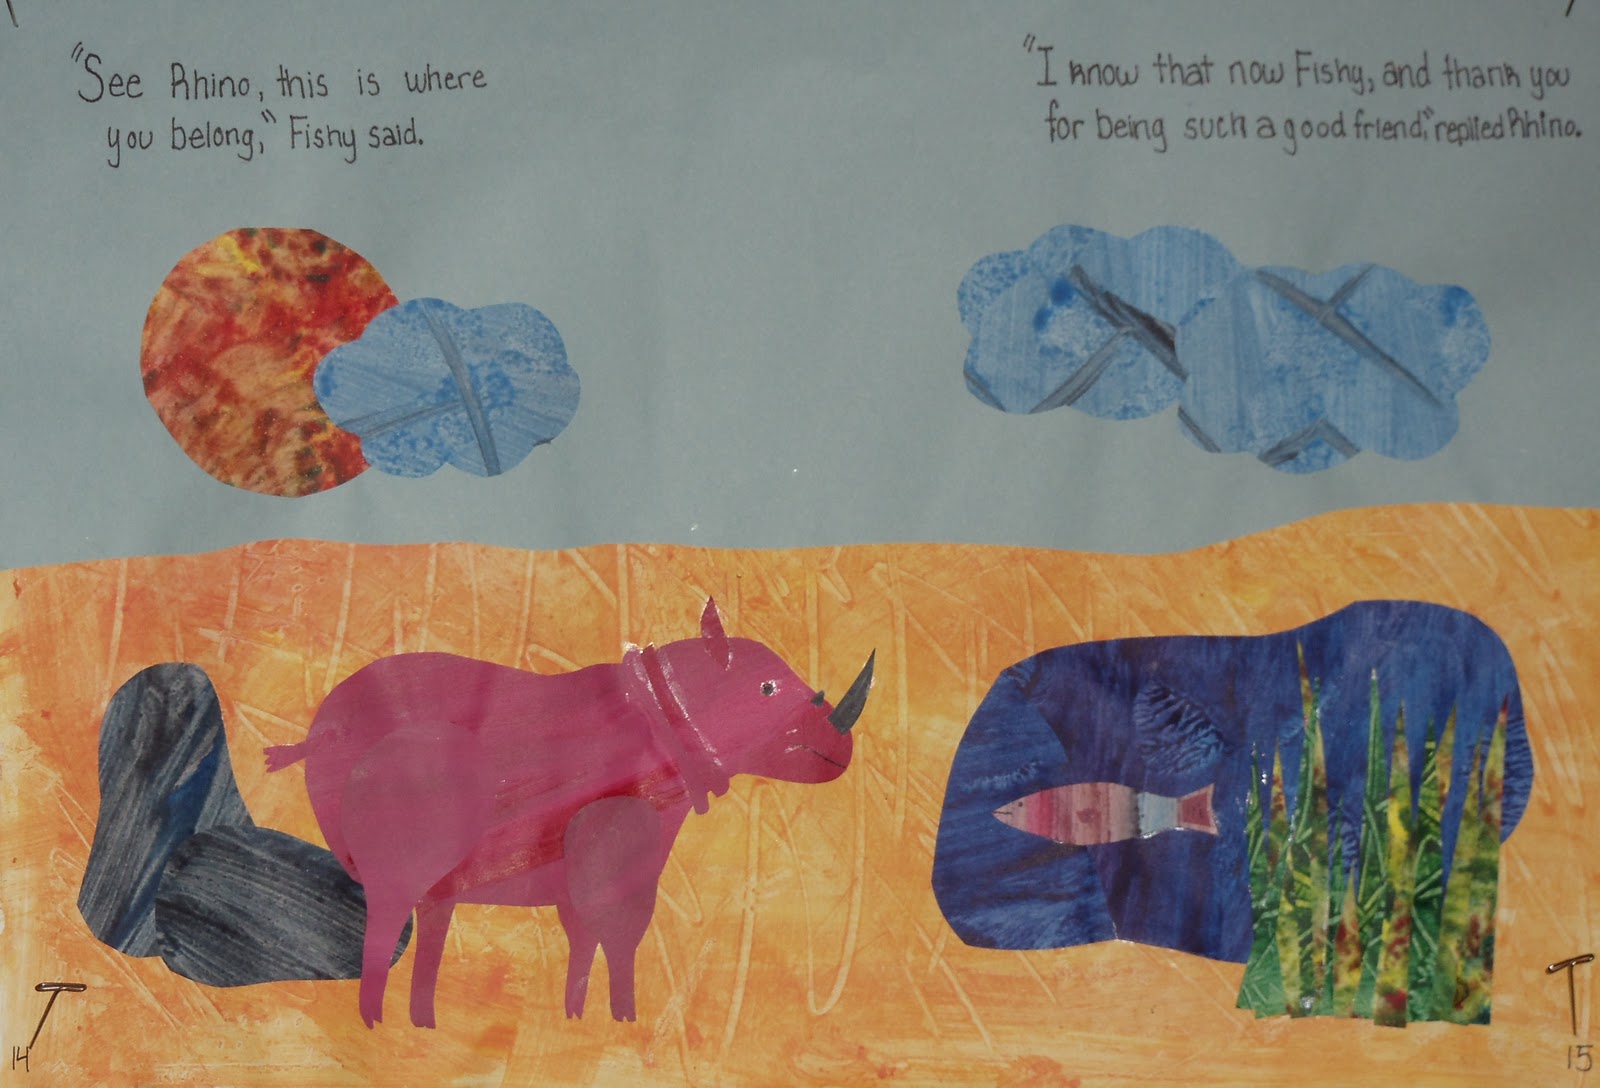
          This project was inspired by Eric Karl and his collage storybooks.  On day one we read an Eric Karl book as motivation.  We also watched a video about Eric Karl and how he creates his illustrations.  Then we created our own two page storybook illustration in the fashion of Eric Karl.  On day one we utilized tempura paints and large sheets of white paper to paint a large number of papers using various colors and textures.  There was no specific color or texture that was required, only that each student was required to do at least several sheets.  Students are encouraged to experiment and see what happens when they utilize different items such as sponges and varying paintbrushes.  These were left to dry until the next class period.  For the next class period, students were asked to have a sketch of their project and what they wanted it to look like.  The teacher encouraged students to utilizing piecing and layering in their pictures so that they resembled Eric Karl’s storybooks.  On day two students cut shapes out of the painted sheets that they created the class period prior.  In order to do this, students were allowed to cut their sketch into pieces to use as stencils for the pieces that they were cutting out of the painted paper.  Then, students glued the pieces on a sheet of paper to create their storybook.
          An extension activity for this project would be in the area of language arts.  Students could write a short story to go along with their two page layout.  The story book could involve the main character that they portrayed in their creation.  For younger kids, they could write a short paragraph about the character that they created in their layout.
          Another extension activity for this project would be to read students an Eric Karl book and a book by another author.  Students could then compare and contrast the two books.  Students could create a two page layout for each author, and share with the class the author/illustrators similarities and differences.

Tuesday, October 12, 2010

Elements and Principles of Design Photographs

This picture, taken of the flowering plant in my front planter, shows my depiction of color.  It shows how utilizing a minimal number of colors can actually look better, and help to create emphasis.  This picture also shows how using all cool colors can actually create a more unified and more appealing image.


This picture is of the railroad tracks on State Street.  It depicts a depth of space.  It does this by having the railroad tracks get closer and closer together, the farther in the distance they are.  Also, the buildings in the background are very small, and thus show their distance from the begining of the railroad tracks.

Footprint "Get-to-Know-You" Project

          The footprint I created depicts many aspects of my life.  First, the fish and the tent depict my love for the outdoors and for my family. This is because camping and fishing are things that my family has done together since I was very little.  The violin represents my love for music, and the fact that I have played the violin since I was a third grader.  The dog collar with “Hercules” is for my Jack Russell Terrier and my boyfriend CJ because Hercy was a gift from CJ.  The cross country runner is there because I ran cross country for six years, and I still love to run recreationally.  The Twilight book is representative of the entire Twilight series, which is my favorite series.  The background of the foot, which may seem a bit over the top, is representative of my crazy, hectic, busy lifestyle.  Finally, I included my middle name, Anne, because it is a family heirloom that has been passed down from generation to generation.
          This footprint was created as a way to introduce myself to the entire class.  It can easily be used in a classroom to help your students feel comfortable, accepted, and get to know one another.  First, have the students trace their foot, and cut it out.  From there, have the students draw, cut, past, etc. things that represent their life.  In this particular project, we were required to use at least three different types of media, and I would suggest that you have your students do this also.  The only other requirement for this project was to include your name so that others would know whose foot was whose.  Also, once the footprints were finished, we had to present them to the class as a “get-to-know-you” activity.  One suggestion though would be to give students time to create their footprints.  Don’t provide them with only 10-20 minutes to create this.  If you want students to share this with the class, provide them enough time to create something that they are proud of and proud to share.
          This idea of using a footprint could be easily transferred into a history class.  You could have students trace a foot, and cut it out.  From there, they could research a person in history to create a footprint on.  As the teacher, you could required the students to choose a person from a certain time period, give them a list of people to choose from, or just let them choose anyone.  It is all up to you and what you want your students to get out of the project!  To make it even better, you could have the students either write a paper on the person, or have them present the footprint to the class.